August 2019 Independent Eating and Drinking Newsletter
| Independent Eating and Drinking are Wonderful |
 |
| August Newsletter Topics: |
|
| Subscribe to Newsletters |
Feeding Ones-Self with a Spoon
Typically, we learn to feed ourselves when we are infants. We start out with finger feeding and gradually acquire the coordination to use utensils. By the time we are two, we are able to manipulate most foods with a spoon or fork, but we most probably still need help cutting food up. However, for some people this evolution of gaining independence does not happen due to disability or illness. For these individuals learning to feed your self is a much greater challenge and may not ever be mastered. The following article describes the steps needed to use a spoon.
Feeding oneself in the traditional way involves a number of steps, and the use and coordination of many muscles. Mastery is not easy and it should not be expected to be acquired rapidly or without great effort. It is recommended that, even though food stays on a fork more easily, that a spoon be used by individuals who might “miss” their mouth while learning to eat. A fork can poke and hurt the person and make them apprehensive of the whole experience of independent eating.
To understand how to facilitate self-feeding, the task should be broken down into the individual steps that comprise the entire act of taking a bite of food. Once these steps are identified, it is wise to make them as easy as possible to achieve. The following will provide a brief discussion of each of the steps and methods to make them easier for the eater:
1. Grasping and maintaining a hold on the spoon handle.
2. Loading food onto the spoon.
3. Keeping the spoon on a level plane after food is loaded and raising it to the mouth.
4. Inserting the spoon into the mouth.
5. Closing ones lips around the bowl of the spoon.
6. Removing the spoon from ones mouth.
7. Returning the spoon to the bowl
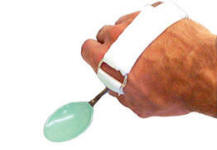
1. Grasping and maintaining a hold on the spoon handle. For individuals who have low muscle tone, holding the handle of a utensil is challenging. A larger surface, like a built up handle on a utensil can make this easier. A cuff can be used to attach the utensil to the hand. There are a wide variety of cuffs on the market and the one that best accommodates the function of the user’s hand should be selected. If wrist control is weak, a wrist support with a cuff would be a better choice than just a cuff.
A few of the many dining aid products are pictured below. Whenever a selection is available, Mealtime Partners recommends selecting unbreakable plastic utensils, or metal that is coated with plastic, rather than plain metal utensils, for the greatest safety.
 |
 |
| Utensils with Enlarged Handles | Using a Spoon or Fork with a (black) Cuff |
 |
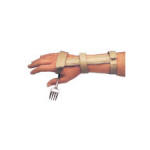 |
| Eating Cuff Holding Utensil | Wrist Support with Eating Cuff |
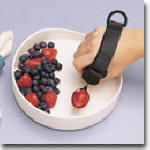
2. Loading food onto the spoon. Foods that stick to a spoon, like yogurt, pudding or thin mashed potatoes, should be used when first learning to feed oneself. This provides some food to the user while they are learning how to reliably pick up food, and maintains their interest in learning rather than them becoming frustrated by the lack of success at acquiring food. It is advisable to only practice independent eating when the person learning is not very hungry. When hungry, frustration can interfere with learning. A scoop dish helps get food onto a spoon more easily than a standard bowl or plate (but a bowl is preferable to a plate if a scoop dish is not available). The location of the scoop edge makes a significant difference in the action required to load food onto a spoon. If the scoop edge is facing towards the back (away from the user) the user will push their hand away from the body in an arm extension movement. However, if the scoop edge is facing forward (close to the user’s body) the hand action is towards the body, closing the bend of the elbow. This is a significant difference, and depending upon the user’s muscle tone and control, the scoop edge should be positioned to accommodate their most productive and repeatable muscle movement. Placing the dish on a sheet of Dycem will help hold the dish in place.
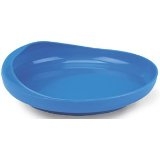 |
| The Scoop Dish |
3. Keeping the spoon on a level plane and raising it from the bowl to the mouth. To be able to feed oneself a wide variety of foods, it is essential that food stays on the spoon once it has been scooped. For this to happen the bowl of the spoon must be kept level as it is moved from the bowl to the individual’s mouth. This requires that the wrist, elbow and shoulder make subtle adjustments to the angle of the spoon as it is moved. This is a highly complex series of actions and is often too difficult to execute, and, as a result, the food spills off of the spoon. Several things can be done to simplify this task. First, eliminate the need for raising the spoon from the bowl to the mouth by positioning the bowl on a raised surface at (or near) mouth level. This can be accomplished by using an over-the-bed table or by placing a box of the appropriate height on the table. The box must be large enough to hold the bowl and allow the user to rest their elbows and lower arms on it. With this arrangement the user must only move their hand forward and backward, not up and down. The spoon can be loaded and moved to the mouth on (approximately) a single plane. To make this even easier, the scoop edge of the bowl can be angled either to the left or right and slightly forward, towards the user. This allows a sweeping movement of the spoon to brush against the scoop and load the spoon and the same movement to continue to the mouth. As the user acquires competence with this movement, the surface can be gradually lowered, increasing the complexity of the task very gradually as they learn greater control.
4. Inserting the spoon into the mouth. This might seem a very obvious part of eating, however, if you have always been fed, it is by no means obvious. If someone has always put the spoon into your mouth for you it is not intuitive to do it for yourself; it is a new experience and must be learned. Verbal prompting may be helpful to encourage independently putting the spoon into the mouth. Finding ones mouth with the spoon is an additional undertaking. Often the mouth is missed entirely or it takes several attempts to access it. Practice may improve this skill but those who have tremors, or other involuntary movements, will always find it difficult. Stabilizing the elbows and forearms (described earlier) makes it easier to access your mouth with a spoon. Arm/hand movements should be analyzed to evaluate whether gross movements or fine motor movements are easier for the individual to execute. This will help establish how to configure the dining environment to allow the user to get the spoon into their mouth with the least amount of stress.
5. Closing ones lips around the bowl of the spoon. Once again, it appears obvious to follow putting a spoon in your mouth with closing ones lips, but for those who have been fed all of their lives, it is not an automatic response. Many caregivers wipe the food off of the spoon, into the mouth, using the person’s front top teeth as a wipe edge. When this is the normal pattern of eating, the individual being fed holds their mouth open, rather than closing their lips over the spoon. When independent eating of any kind is introduced (self feeding or with assistive technology) the individual must learn to close their lips to remove the food from the spoon. First try verbal prompting. Both verbal and physical assistance may be needed to moderate this movement. If verbal assistance fails to achieve the desired results, physical assistance can be provided by gently helping the person close their lips over the spoon with your fingers. Repeat this help as many times as necessary. Remember to allow the individual, who is learning, plenty of time to attempt to independently create lip closure, prior to assisting them. It takes time, both cognitively and physically, to close your lips when it is a new experience.
6. Removing the spoon from ones mouth. When the spoon is in your mouth and your lips are closed around it, the next step is to remove the spoon from your mouth. The lips should be slightly relaxed but they should not be opened. This allows the spoon to be removed while the food remains in the mouth. Opening the mouth wider will allow food to fall out of the mouth or for the food to simply remain on the spoon. Physical assistance with holding the mouth gently closed can help the individual learn what they must do with their mouth when removing the spoon if verbal prompting alone does not work. Also, the individual must learn to coordinate their mouth movement with the hand and arm action necessary to remove the spoon from their mouth.
7. Returning the spoon to the bowl. The final step in completing the sequence of taking a bite of food is to return the spoon to the bowl. The action of removing a spoon from ones mouth tends to create an exaggerated arm movement that pulls the arm away from the body. Verbal or physical assistance may be needed to moderate this movement. If some food is remaining on the spoon, this movement might cause some spillage. Using a vinyl table cloth under the person’s chair can make clean-up easier. Practice will lessen or eliminate these problems.
Feeding oneself is a complex undertaking and within each of the seven steps described above are many demanding sub-tasks. For many individuals, independent eating is a strenuous activity that burns a great number of calories. Additionally, because it is such a demanding job, it can tire the individual. All of these aspects must be considered when looking at the long term goal of mealtime independence. Does the individual burn excessive calories feeding themselves? If so, they may benefit from assistance from a caregiver for part of a meal. Or assistive technology, like the Mealtime Partner Dining System, could be used to allow them to be fully independent in eating, while reducing the number of calories burned while eating.
Remember eating should be enjoyable and if it becomes a struggle, the pleasure of the experience is diminished. Feeding oneself by hand, does not have to be abandoned because it is difficult or tiring but it can be supplemented with the right equipment. A thoughtful blending of eating methods can provide a higher quality dining experience without sacrificing dignity or independence.
|
The Mealtime Partner Dining System provides eating
independence and reduces the risk of choking or aspiration |

|
|
The Mealtime Partner Dining System is able to serve foods from
puree texture to normal bite sized pieces of food. For those who
are unable to feed themselves and, therefore, must be fed by
another person, the Mealtime Partner Dining System provides an
alternate to being fed. It is not only a way of becoming
independent at mealtimes but also is a safer way to eat than
being fed by another person, because the person eating can
choose when they take each bite of food and can chew as long as
they wish. This reduces the risk of choking or aspiration that
occurs when people eat hurriedly. More information about the Mealtime Partner Dining System is available at our website under Dining. If you are not sure which system to choose when considering purchasing a dining system, call 1-800-996-8607, or email our staff for assistance at info@mealtimepartners.com. We will be happy to assist you. |
What Can the Mealtime Partner Serve?
As a change of pace in our Newsletter, this month we will answer some questions about what food can be served in the Mealtime Partner Dining System. Many illustrations of the Mealtime Partner Dining System (sometime referred to as the Partner) actually serving food do not specifically define what is being served, but many people believe that it can only serve a limited number of foods. When people see the Mealtime Partner Dining System at conferences and expos, the food being used to demonstrate the device’s abilities are, out of necessity, non-perishable or have a long shelf life once opened. This can impact people’s perception of it's capability to handle a diverse range of foods. The Mealtime Partner Dining System can serve most normal table foods as long as they are cut into the appropriate sized pieces. Additionally, it can serve all texture-controlled diets ranging from pureed to minced, or chopped.
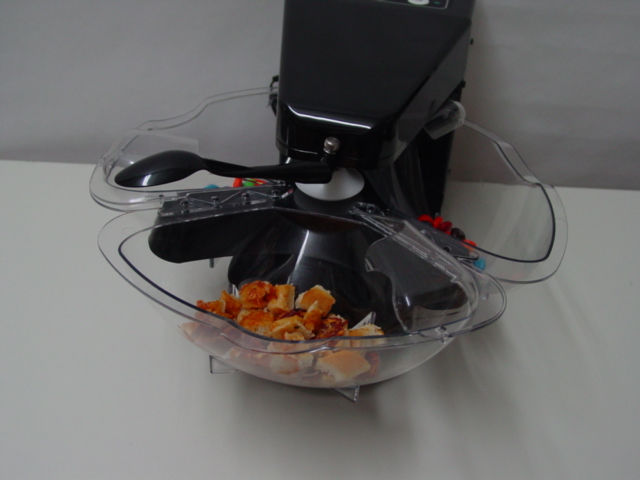
First, it will be illustrated how the Partner is able to serve pizza, and also show how important it is to cut the food into small enough pieces to facilitate all of the food being served. Also, it will be illustrate how using different Bowl Covers effect serving pieces of food, like pizza. Although these illustrations show pizza being served, the same principle applies to all food that is cut up in preparation for serving. Food should be cut into pieces that are around 3/8 inch cubes.
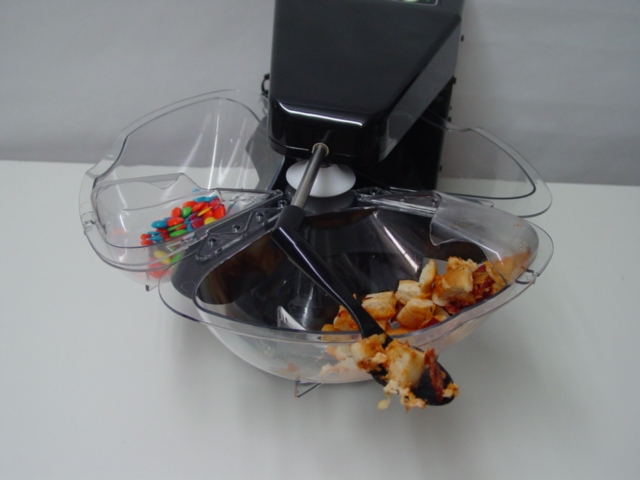
Below left is a picture of a slice of pizza cut up and ready to be served. Note that the High Bowl Cover is installed on the bowl. As shown in the picture to the right, with the High Bowl Cover on the bowl, the spoon has scooped three bite-size pieces of pizza and a piece of loose pepperoni; a second scoop (not shown) picked up four pieces of the pizza. Each spoonful may differ in quantity and, as the bowl empties, a more consistent number of pieces are usually served for each bite. If you are having trouble with the spoon not retaining any pieces when it moves from under the Bowl Cover, either the pieces of food are too big, or there is too much food in the bowl. (The Mealtime Partners bowls are designed to serve one cup of food; the top part of the bowl is used for manipulating the food so that the appropriate amount of food will be loaded onto the spoon. One should avoid overfilling the bowls to consistently get a well-rounded spoonful of food.)
  |
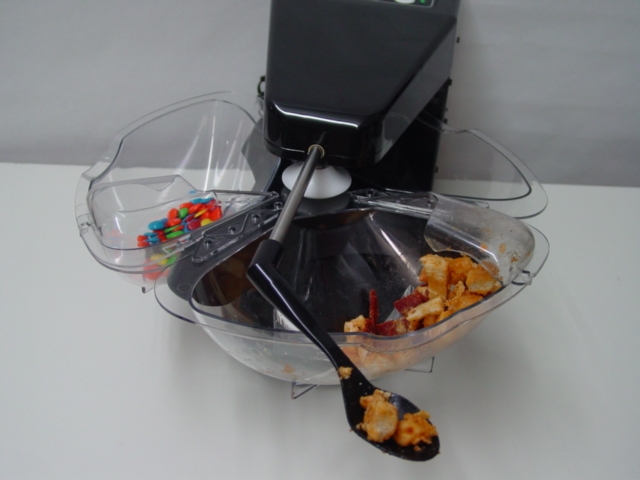
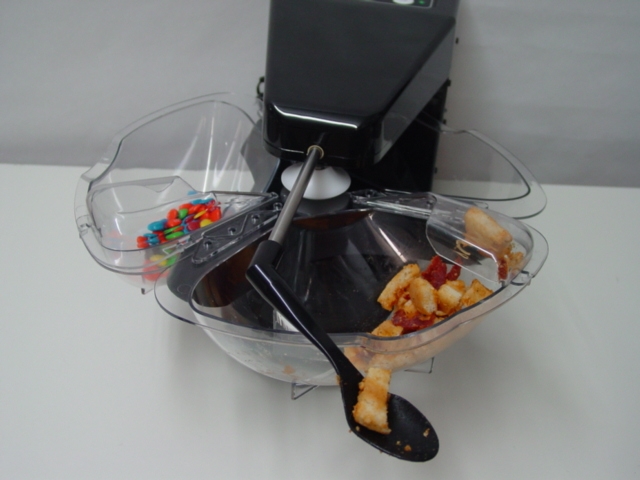
Using the Medium Bowl Cover to serve pizza (as shown below left), the spoon scoops two pieces. (With the next scoop, it picked up three pieces. As can be seen, the Medium Bowl Cover is quite suitable serving pieces of cut-up food for those who prefer a smaller bite.) With the Low Bowl Cover installed on the Mealtime Partner Bowl (shown below, right), the spoon picks up a single piece of pizza. (However, with the Low Bowl Cover, it frequently does not pick up any pizza, which is why it is usually avoided for serving cut up pieces of food.)
  |
The following illustrates why three different Bowl Covers are provided with each Mealtime Partner Bowl: Low, Medium and High. The pictures below show how many M&Ms are served using each cover. The three Bowl Covers allow each user to have the size of bite that is appropriate, or preferred, for them.
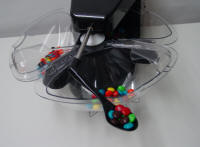 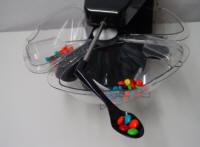 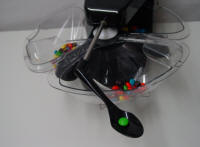 |
Some people who have always been fed, find that the bites are small, even when using the High Bowl Cover. This is normally because, in a quest to feed the person as quickly as possible, primarily large bites of food have been provided to the eater. Some people are fed using a dessert spoon (or table spoon) to provide the food. The Partner serves small bites to be sure it is providing a safe volume of food at each bite. When using the Mealtime Partner, there is no need to rapidly consume food. It is never in a hurry to finish a meal.
The volume of food provided for each bite is especially important for those individuals who receive a texture-controlled diet. The following illustrations show that even with soft foods (like applesauce), the volume of food on the spoon is significantly different depending upon which Bowl Cover is being used.
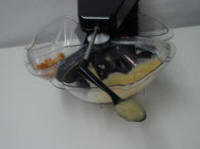 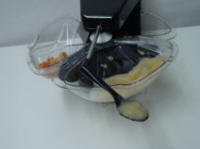 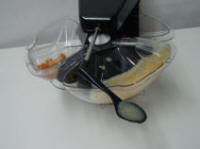 |
||||
| Using High Bowl Cover | Using Medium Bowl Cover | Using Low Bowl Cover | ||
The Mealtime Partner has been designed to accommodate diverse user needs and is able to accommodate a wide variety of foods and users bite size preferences. We hope that this information is helpful. Bon Appetite!
.
|
Did you know? Did you know that some bacteria are resistant to antibiotics? One of the common bugs that become antibiotic resistant is methicillin-resistant staphylococcus aureus (MRSA). MRSA can cause pneumonia, skin infections, and blood infections, and is very dangerous for people who are sick, or have a weakened immune system. Bacteria, called persisters, are contained within MRSA infections and are able to protect themselves from antibiotics by becoming dormant when antibiotic drugs are administered. In this dormant state, they do not grow or reproduce which is when antibiotics typically kill bacteria. Persisters are enclosed in a membrane that controls what can reach them, which also protects them from antibiotics. However, recent research has found that a combination of drugs is able to penetrate the membrane and kill the bacteria. Using older drugs that are “repurposed”, scientists were able to penetrate the persister membrane. However, because the drugs are very strong, large doses caused the bacteria to burst, which could trigger them to become resistant. As a compromise, the drug is administered with a standard antibiotic. One drug allows membrane penetration while the other kills the bacteria. More information about this subject can be found at the following link: https://www.npr.org/sections/health-shots/2019/08/12/749366768/to-find-the-next-antibiotic-scientists-give-old-drugs-a-new-purpose |